Guest Post:
Custom Hatch Cover and Tillers
For this post, we are thankful to our Dad for writing it! It only made sense, as he is the mastermind of the wonderful hatch and tillers that we now have for the boat. We can't wait to get them attached to the sailboat, which should be pretty soon! Thanks so much dad for your hard work with these projects, and for writing today's post!
--------------------------------------
I love my son and his wife, and I was so excited to have an opportunity to make a couple things for their new boat. I really enjoy woodworking projects and when I was asked about making a new hatch, it was a big challenge. I knew I had several strips of teak and was hoping I could build a hatch cover from scratch. The difficulty was being so far away from the boat. We live in southwest Michigan. I took measurements of the hatch opening, the old hatch cover, and took pictures as well.
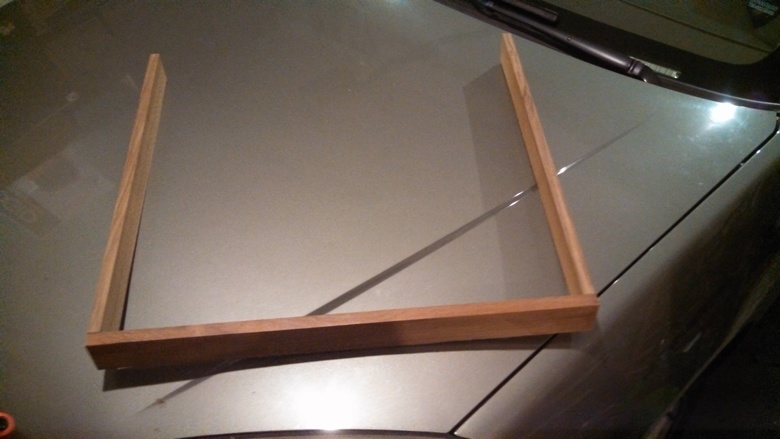
At home, I tacked a frame together, including the curve at the top, and took it back to Toronto when I helped move the sailboat from its place of purchase to its new home in downtown Toronto. We test-fitted, and I was sure glad I didn’t build the whole thing yet. It needed to be more square than I thought (on three sides), slightly wider and longer. The curved top was a good fit, so back to Michigan we went. I took the frame apart and started over.

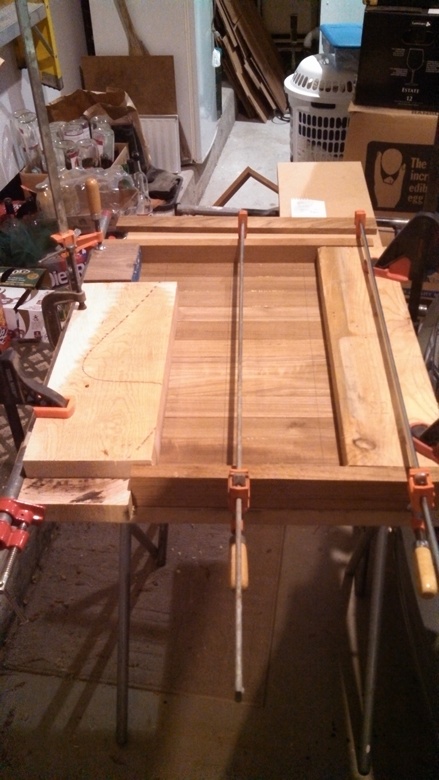
The strips of teak were all approximately the same width, but different thickness from one end to the other. I cut off the end that was too thin and planed down the rest to one standard thickness, approximately ¾”. I planed the edges to make sure they were consistent and square, as they would be biscuit-joined and glued together. After biscuit-joining and gluing together the strips of teak for the top of the hatch, I clamped it all down and let it set for 24 hours. I made a frame of teak with three sides square, then glued and nailed the top on the frame. I made the top a little longer then the sides because it needed to have a curve since the hatch opening was curved at top (bow side of the hatch). I cut the top of the hatch cover to the same curve as the opening, so now I had a hatch cover with three sides, but still needed to put a front on the curved portion of the hatch cover. I cut strips slightly longer and planed them in thin strips so I could bend them around the curve at the front of the hatch cover. I epoxied and nailed each thin strip, clamping them in place to dry. Later, I trimmed any overlap and began the long process of sanding (hooray for electric sanders!).
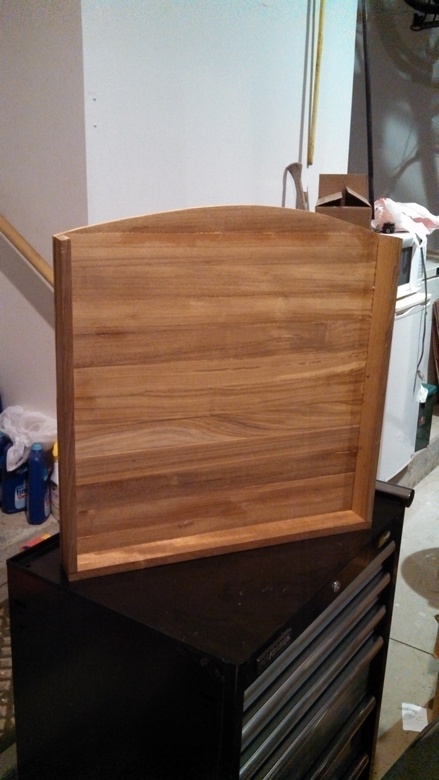
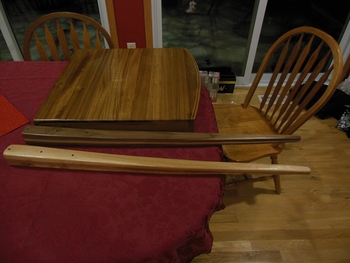
I epoxied any cracks or crevices (there were very few, and small) and after a final sanding and cleaning of dust, began finishing. I purchased a good quality UV resistant exterior finish from a woodworkers supply in Grand Rapids, MI. and put on several coats. Of course, I have no idea if it will fit! When Jeff and Angie were here in Michigan for Christmas, we sent them home with the hatch cover and Jeff has told me it needs a little trimming on the bottom side edges, but it should fit real well. Having never made a hatch cover before, it felt good knowing it just might work out.
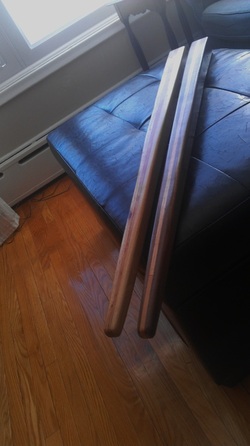
I also have never made a tiller handle before, but their tiller handle was in rough shape, so I actually made two tiller handles. I learned so much from the first one, I wanted to make a second. Most woodworkers would laugh at my method for the first handle, but it worked. I laid the tiller handle on its side on a black walnut board and traced the shape. I cut it out and then used that piece to trace two more…one on another piece of black walnut wood, the other on oak. Now I had three pieces with the same curve, but the same thickness. I noticed the original tiller handle was tapered, especially the two outside strips. They were thick on one end and gradually tapered to the hand end. I have no idea how the professional boat builders do this, but I was determined to make it. So, I measured the thickness of the outside pieces on the original in several places and applied the same measurement to the new pieces. Then, turning them on edge, used my band saw to cut the taper free-hand. It was not easy and left a considerable amount of sanding. I used a good epoxy to glue the three strips together, clamped them together and let them set for 24 hours. I drilled the holes for the bracket, sanded the handle smooth and rounded the edges, and that’s when I noticed a small crack in the middle strip of oak, about 1 ½” up from the tip at the hand-hold end. I should have known, the grain in oak is courser than other hardwoods and probably was not the best choice for the middle piece. But, the rest of it looked real good and strong. So, I cut out the bad piece, cutting up further than the crack, and epoxied a new piece of cherry in its place. After clamping and drying, I cut the extra edge off, sanded and finished with several coats of UV resistant exterior finish (I sent the rest of the can home with Jeff, so maybe he can tell you the brand).
I also have never made a tiller handle before, but their tiller handle was in rough shape, so I actually made two tiller handles. I learned so much from the first one, I wanted to make a second. Most woodworkers would laugh at my method for the first handle, but it worked. I laid the tiller handle on its side on a black walnut board and traced the shape. I cut it out and then used that piece to trace two more…one on another piece of black walnut wood, the other on oak. Now I had three pieces with the same curve, but the same thickness. I noticed the original tiller handle was tapered, especially the two outside strips. They were thick on one end and gradually tapered to the hand end. I have no idea how the professional boat builders do this, but I was determined to make it. So, I measured the thickness of the outside pieces on the original in several places and applied the same measurement to the new pieces. Then, turning them on edge, used my band saw to cut the taper free-hand. It was not easy and left a considerable amount of sanding. I used a good epoxy to glue the three strips together, clamped them together and let them set for 24 hours. I drilled the holes for the bracket, sanded the handle smooth and rounded the edges, and that’s when I noticed a small crack in the middle strip of oak, about 1 ½” up from the tip at the hand-hold end. I should have known, the grain in oak is courser than other hardwoods and probably was not the best choice for the middle piece. But, the rest of it looked real good and strong. So, I cut out the bad piece, cutting up further than the crack, and epoxied a new piece of cherry in its place. After clamping and drying, I cut the extra edge off, sanded and finished with several coats of UV resistant exterior finish (I sent the rest of the can home with Jeff, so maybe he can tell you the brand).


The second tiller handle went smoother. I again traced the original onto two pieces of hickory boards and one piece of cherry. Still, I had this problem of how to best get the taper in the two outside pieces, as well as some in the center piece. I used my planer to accomplish this very tricky task. I started one end in the planer and then gradually turned the crank, remembering both the point and how many turns for each pass. I could always get it back to the starting point, but each time I needed to plane a little more off, until I got the right thickness on the narrow end. I needed to keep all the inside edges (both sides of the middle strip and the inside edges of the outside strips) flat and true because they would be epoxied together. This time, I epoxied the three pieces together before cutting the shape. After clamping and drying, I cut the shape out of the 3-ply hardwood and began sanding, and sanding, and sanding. Once again, I drilled the holes for the bracket and applied several coats of finish.
It was such a joy to present to Jeff and Angie the 3 pieces at Christmas when they were home. They were thrilled and it is such an honor to have a part in their new adventure.
